
So chicken Kiev. I've always loved it when I've had it, but never really thought of making it myself. I worried the butter would spill out during the cooking process and I'd ruin it. Therefore, I tend to stick to the frozen Barber chicken version. I like having something in a pinch if I don't feel like cooking. Then I realized, it's not actually that hard to make. Harder, in my opinion, if you're using boneless breast of chicken and you need to get it AIR TIGHT so that butter doesn't leak. I decided to keep this as simple as possible. And so I give you a fantastic dinner for two: ground chicken Kiev.
What is Chicken Kiev and Where is it From?
I've consulted Wikipedia on this one and it seems the origins of chicken Kiev (aka chicken Kyiv) are a bit murky. It's generally known to have Ukrainian and Russian origins. It was mentioned in the Wikipedia entry that the dish may have been brought to that region by two French chefs. Still, the origin seem to be disputed. Chicken kiev is typically made by pounding boneless chicken thin and rolling it up with butter inside. Then it's dipped in egg and bread crumbs and either fried or baked.
Ground Chicken Kiev: A Slight Modification
You know I love stuffing chicken, right? However, trying to put frozen, herbed butter inside a boneless breast of chicken without it leaking is a culinary fête in my opinion. It's not like cream cheese, gruyere, ricotta or mozzarella. When those cheeses melt, it's a delightful, oozy yummy treat. If you're butter leaks when cooking chicken Kiev, you've ruined the dish. It'll either get lost in the oil or leak out when baking and burn in the oven.
Would you like to save this?
You'll also be the first to hear about new recipes in my weekly-ish newsletter! 🙂
Traditional chicken Kiev with boneless breast of chicken is totally awesome - a culinary classic, but it's for more advanced home chefs. I tried this version using ground chicken and found it works great. I think this is a little more doable for the casual home cooks out there.
Easy Steps for Making Ground Chicken Kiev:


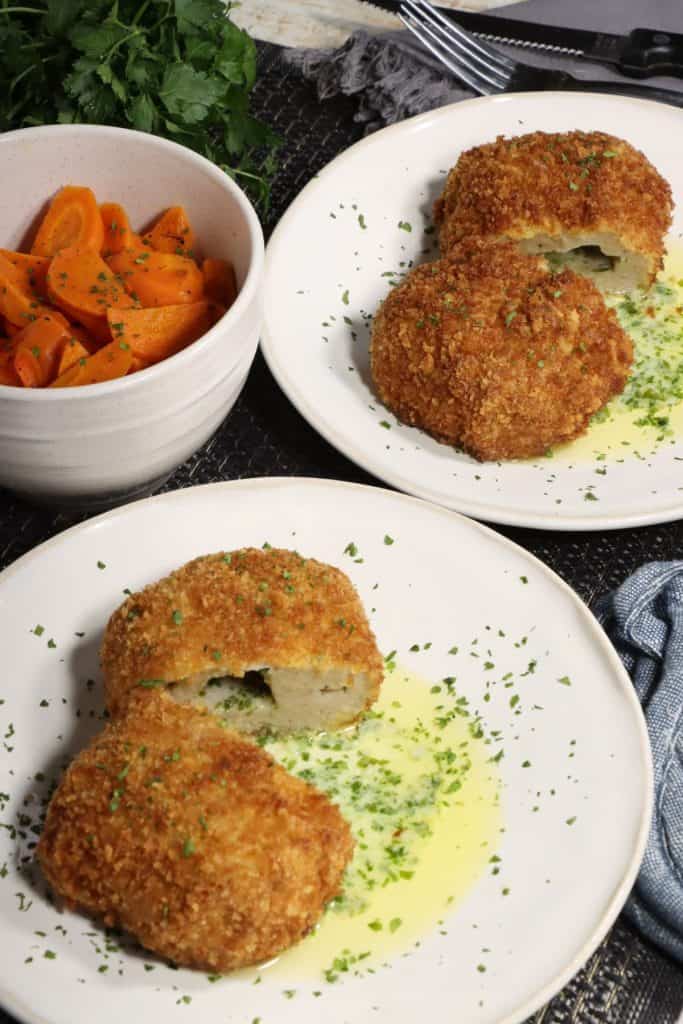
Dinner for Two: Ground Chicken Kiev
- Prep Time: 25 minutes
- Cook Time: 20 minutes
- Total Time: 45 minutes
- Yield: 2 portions 1x
Description
Dinner for two: ground chicken Kiev is a crunchy, garlicky delight with the slight variation of using ground chicken. It's delish!
Ingredients
The Garlic/Parsley Butter:
- 1 teaspoon parsley, finely chopped
- ½ teaspoon garlic, finely diced
- 4 tablespoons salted butter, softened
- 1-2 teaspoons additional parsley for optional garnish
The Chicken:
- 1 pound of ground chicken (see note#1)
- ½ teaspoon salt
- ½ teaspoon garlic powder
- ¼ teaspoon black pepper
- Neutral oil for frying (see note#2)
The Dredge:
- 2 eggs, beaten
- ⅔ cup all-purpose flour
- ¼ teaspoon salt
- 1 ½ cups plain panko bread crumbs
Would you like to save this?
You'll also be the first to hear about new recipes in my weekly-ish newsletter! 🙂
Instructions
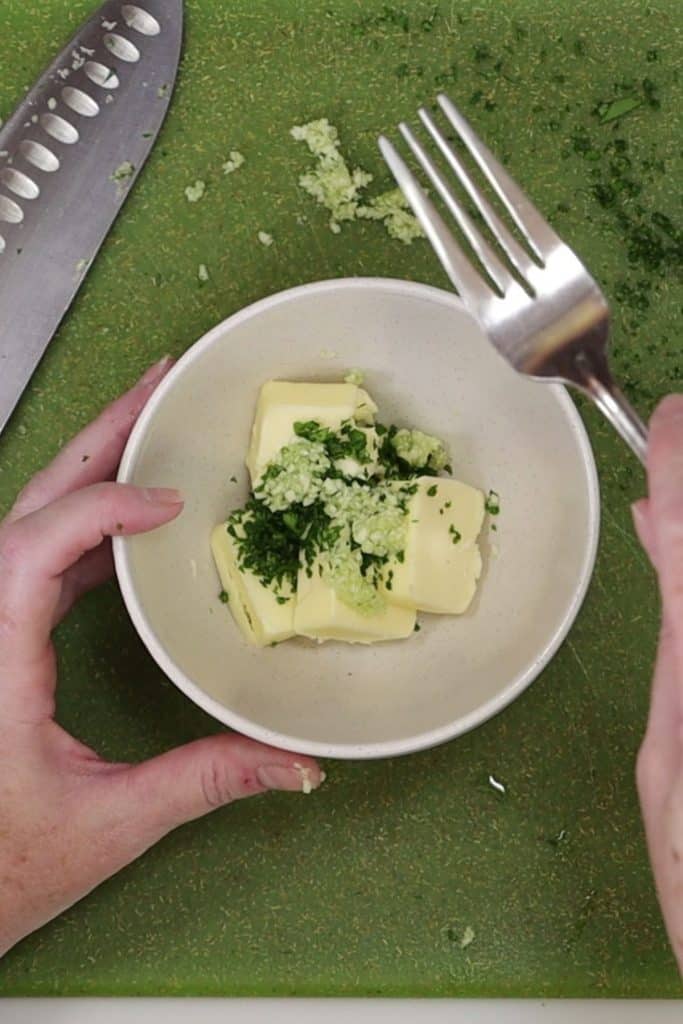
- Finely chop the parsley and garlic. Add the parsley and garlic to the softened butter and mix with a fork until well combined.
- Place butter onto some plastic wrap and shape into a small log. Wrap in plastic and stick in the freezer until hard. Should take an hour or so. You can make this the day before if you like.
- Put the ground chicken into a mixing bowl and add salt, garlic powder and pepper. Set aside for a moment.
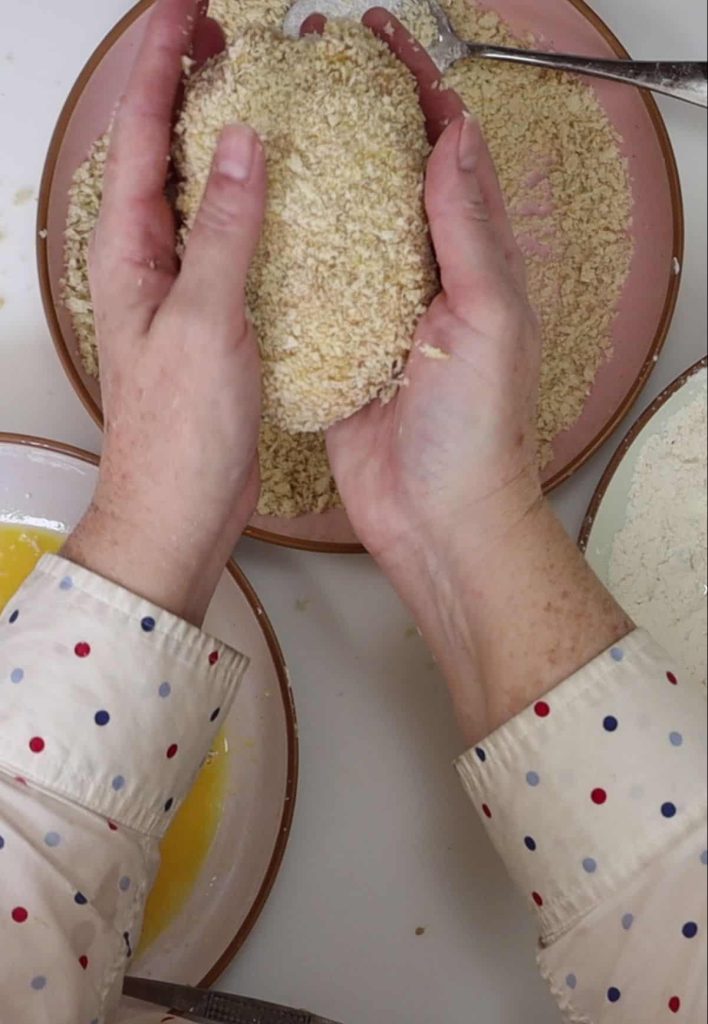
- Set up your dredging station with three wide bowls or plates. Beaten eggs in one bowl, plain panko bread crumbs in one bowl and flour and salt in one bowl. Be sure to mix the salt together with the flour.
- Using your hands (gloves work well here) mix the ground chicken together until everything is well mixed. Let the mixture sit a few minutes.
- Cut the frozen parsley garlic butter in half lengthwise. One for each portion.
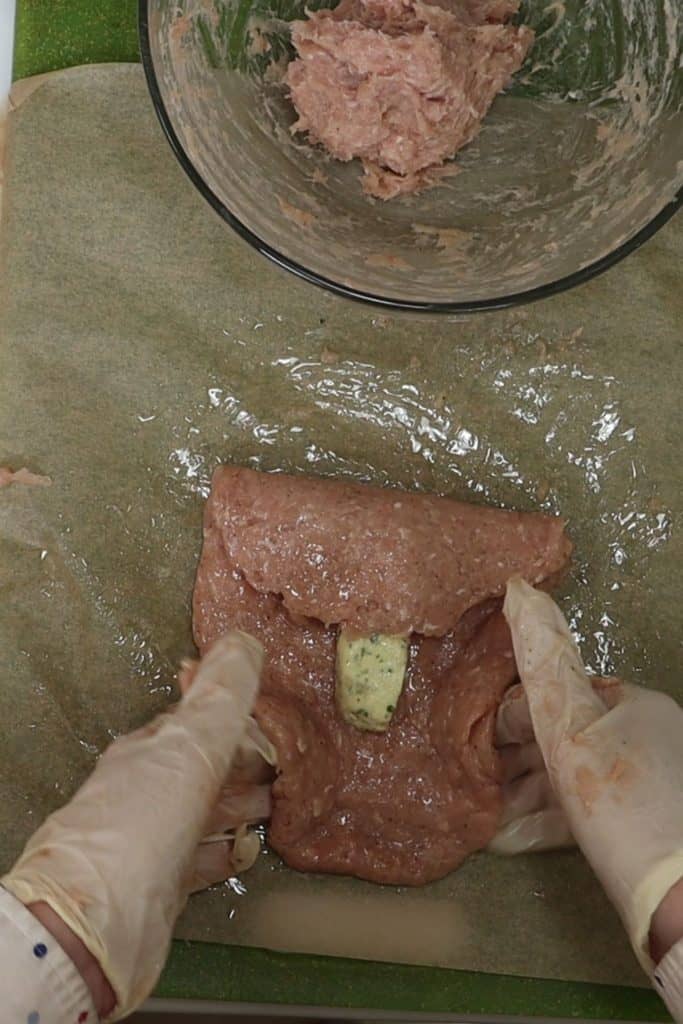
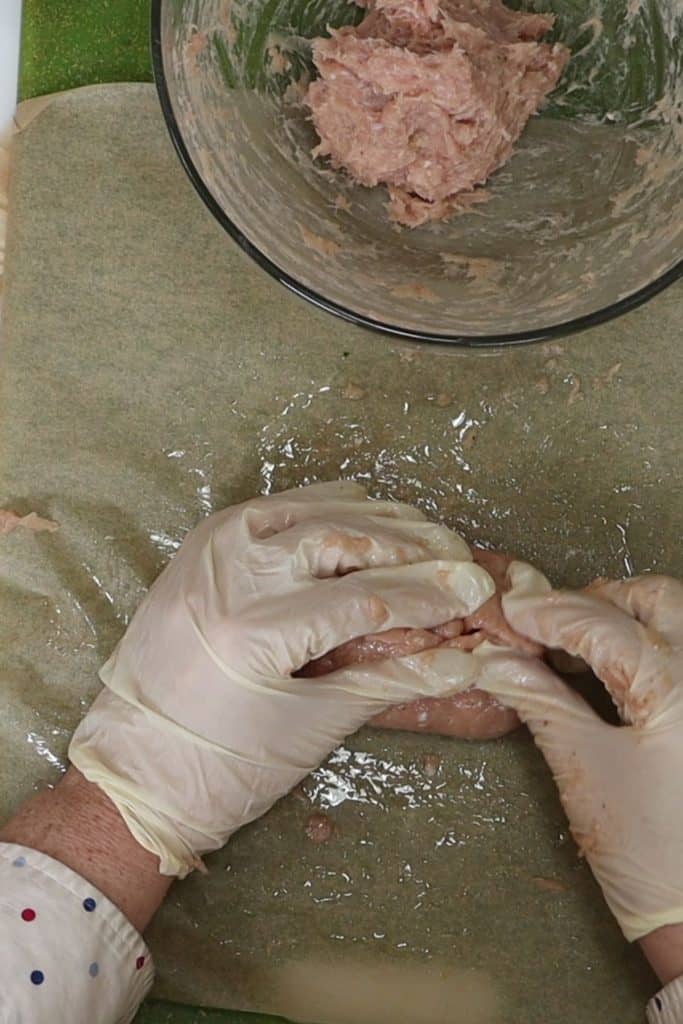
- Cut a piece of parchment paper and place it on your cutting board. Drizzle a little neutral oil on the parchment paper and spread it around. This is where we flatten the chicken and want to make sure the chicken does not stick to the surface. Using ground chicken means we have to be delicate in handling the chicken or it will fall apart.
- Split the mixed ground chicken into two portions. Take the first portion and flatten it out onto the oil. Use your hands and fingers to gently push the chicken and spread it out. It needs to be wide enough to fit the butter so we can wrap the chicken around the butter. (my video shows this well)
- Take one of the butter chunks and place it in the middle of the flattened chicken.
- Carefully (and gently) fold the top down, then the bottom up. Press the “seams” and pinch gently to close them. We need the chicken to be air tight around the butter. This is the most important part of the process. Fold in the sides and do the same. Pinch the fold seams closed and smooth with your fingers. My video shows the process well. Follow the same process for the second portion.
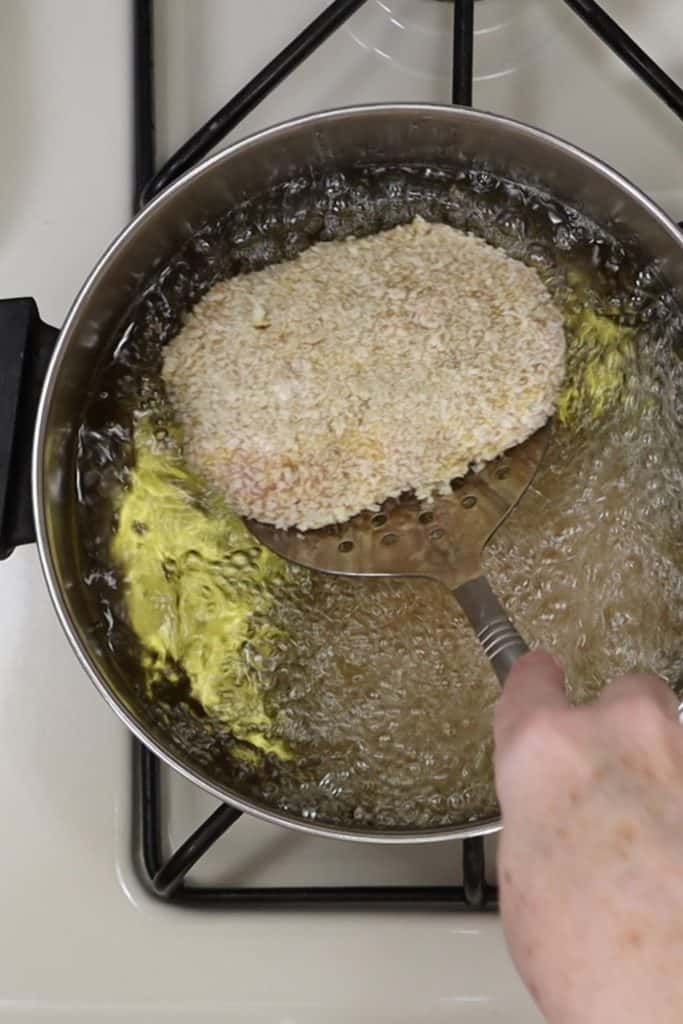
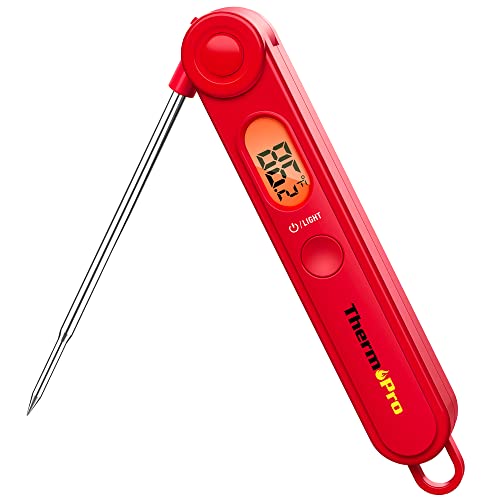
- Put your neutral oil in a pot and start heating the oil. It should be about 375 degrees before you start frying. Don’t let it get hotter than this or you will burn the outside of the chicken. The oil can heat while you are dredging. Keep your eye on it and use a thermometer to check the temperature.
- Time for the dredging station. You will coat the chicken in this order: egg, flour, egg again then plain panko crumbs. Remember: the chicken is very delicate and should be handled with care so it doesn’t fall apart. When turning, use your hands and a spoon or two spoons. If you don’t want to turn it because it scares you, leave the chicken in the egg and spoon the egg over the chicken. Same with the flour – place chicken in flour and spoon flour over it rather than turning. Always use a spoon to assist in moving the chicken pieces.
- Once both pieces of chicken are coated, it’s time to fry them. You should also preheat your oven to 350 degrees. We are flash frying the chicken to get the outside golden brown – then we will finish in the oven.
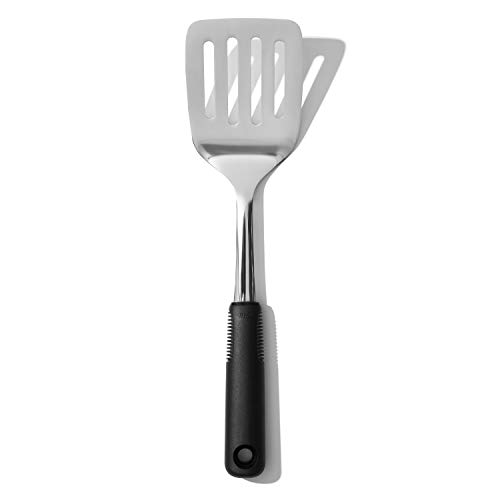
- Very carefully, one at a time, add your chicken to the oil. It will only take about 3-4 minutes to get the panko crumbs golden brown and crunchy. Once you can see the panko turning golden brown, use a metal spatula and a spoon to gently and carefully turn the chicken over. We want to make sure they are evenly cooked on both sides.
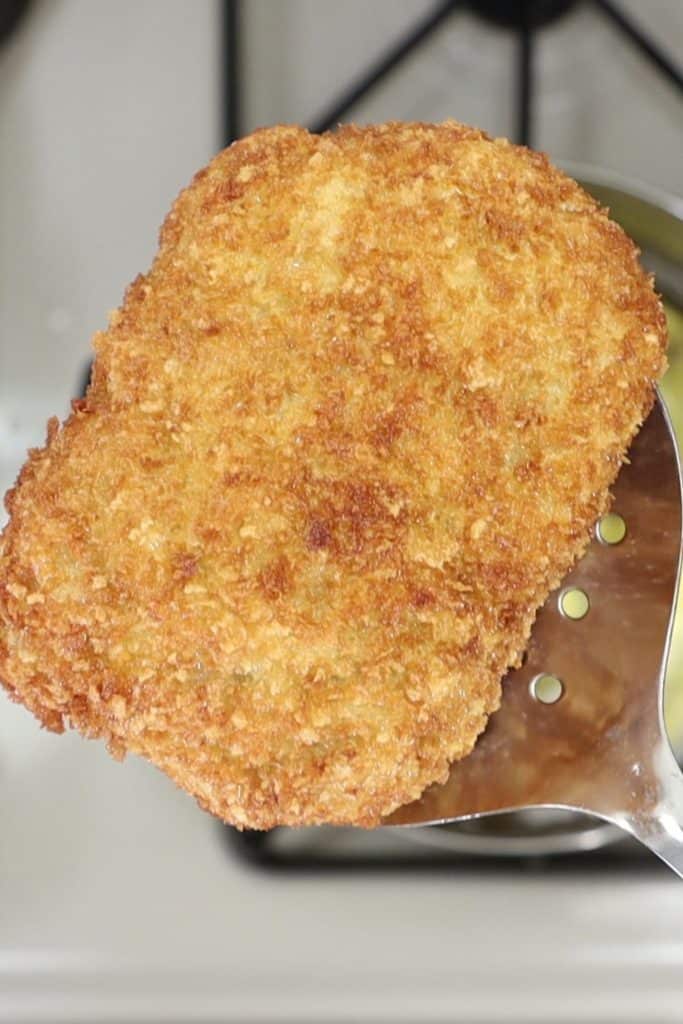
- Once the chicken is golden brown, transfer to a small sheet pan or baking dish. Take a sharp, pointy knife and make one tiny hole in the top of each piece of chicken. Then cook in your preheated oven for 15 minutes.
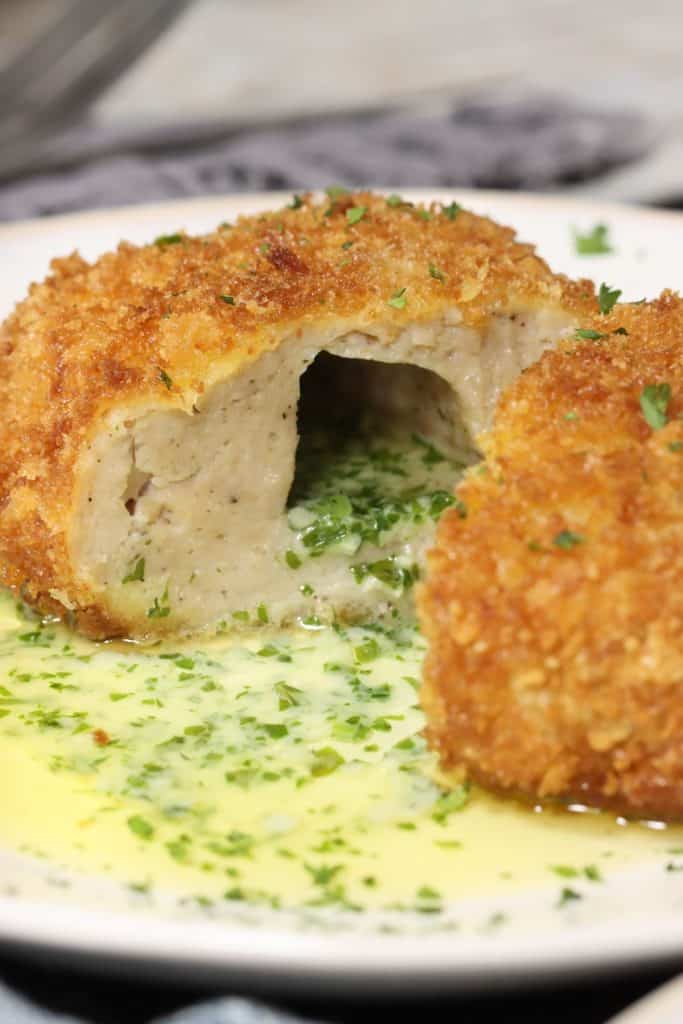
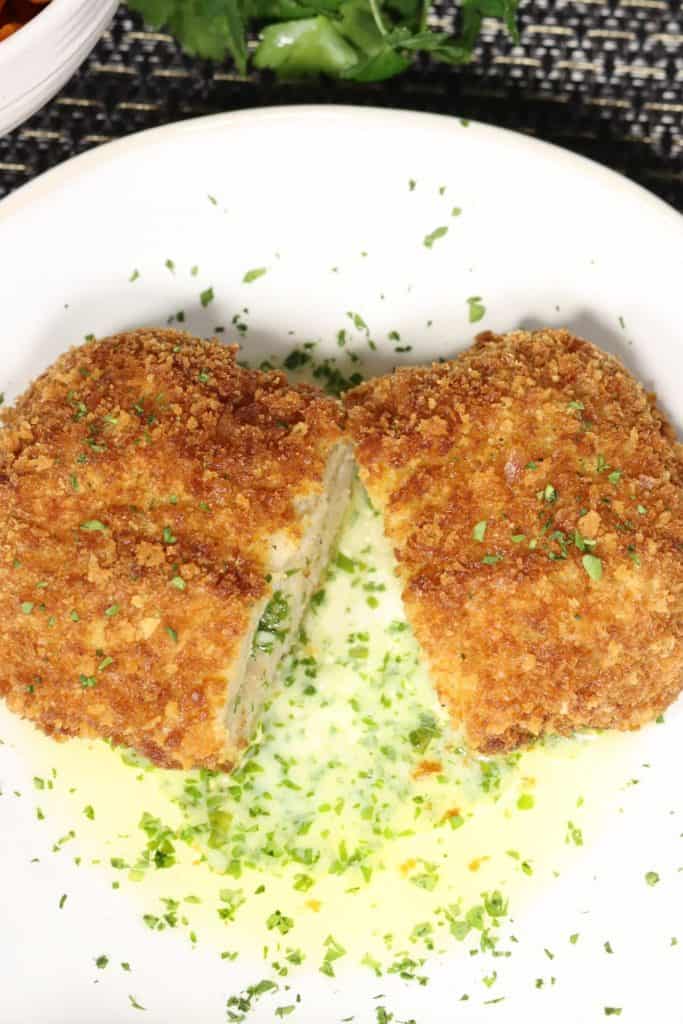
- Let the chicken cool a few minutes before cutting into it. Remember, the goal is that your awesome parsley, garlic butter is now melted INSIDE the chicken. When you cut into it, the butter will come spilling out. BE CAREFUL when you cut into it. Cut slowly. If you do this too quickly, the butter can squirt out of the top and burn you. Go slow.
- You can serve with veggies on the side if you like. I served with carrots because the carrots taste great in that garlicky butter. J Enjoy!


Notes
- With the ground chicken at the store there were two options. The package that said “ground chicken” which is what I used for the recipe. There was another package that said “ground chicken breast” which was a leaner option. Either will work great with this recipe, but I liked the “ground chicken” slightly more than the leaner option.
- I used canola oil to fry the chicken. It’s hard to say how much oil you will need since everyone will use different size pots or pans to do this. I can give you an approximate amount of about 5-6 cups.


Linda
Wonderful recipe…much better than trying to stuff whole chicken breasts..the butter always leaks out,but with this when you cut into it…a river of garlicky goodness flows out! With mashed potato and some greens of your choice….”chef’s kiss “
Stacey
Thank you so much Linda! Makes me so happy you enjoyed it. 🙂
Carolyn Walloch
Why do you poke a hole in the top?
Stacey
Hi Carolyn!! The hole is poked after the chicken is removed from the oil so you don't risk it exploding in the oven.
Have you ever cooked a pre-stuffed, frozen Barber chicken? When do you know it's done? Usually, it's when the filling starts to explode out of the top or sides.
We don't want to lose that really flavorful, awesome butter we made. We're giving it a little breathing room inside the chicken so it doesn't explode.
Julie
Delicious! First time I’ve made Kiev and it was a huge success, thank you. I only shallow fried the chicken and left in the oven a little longer and it was just perfect 👌. Will definitely make this again - so worth it.