
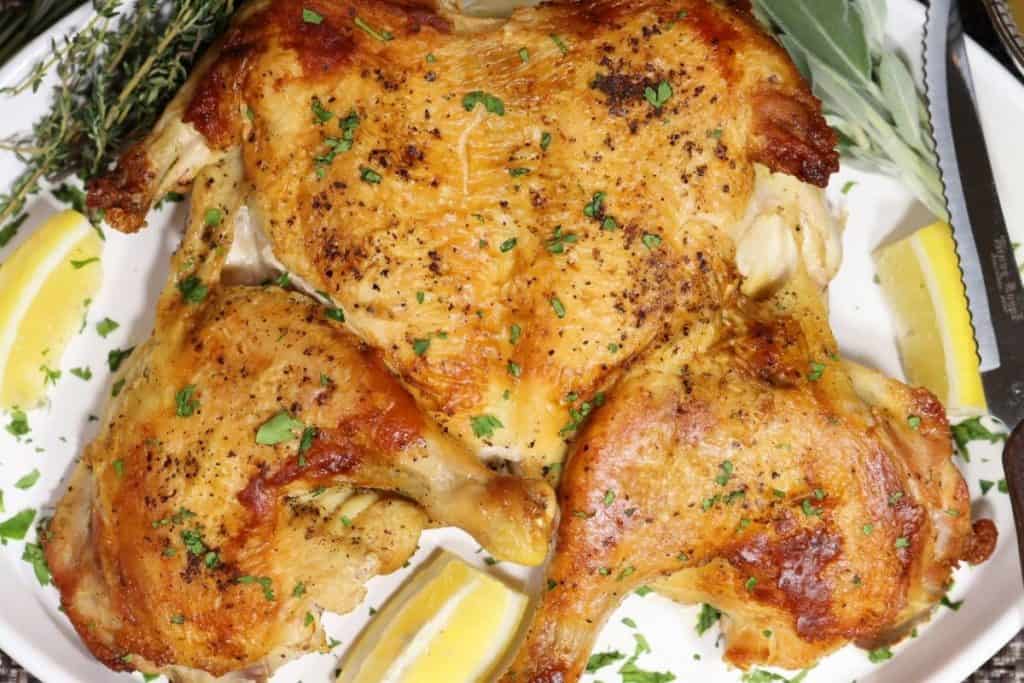
Have you heard of brick chicken? The name is exactly as it sounds. Flatten a whole chicken, wrap bricks in foil, place on top of chicken, roast in the oven. The result will most likely be the best chicken you'll eat in your life. And crispy brick chicken with pan sauce and veggies, it's a simple pleasure in life meant to be savored, and hopefully, shared with your loved ones.
Do you need actual bricks to make brick chicken?
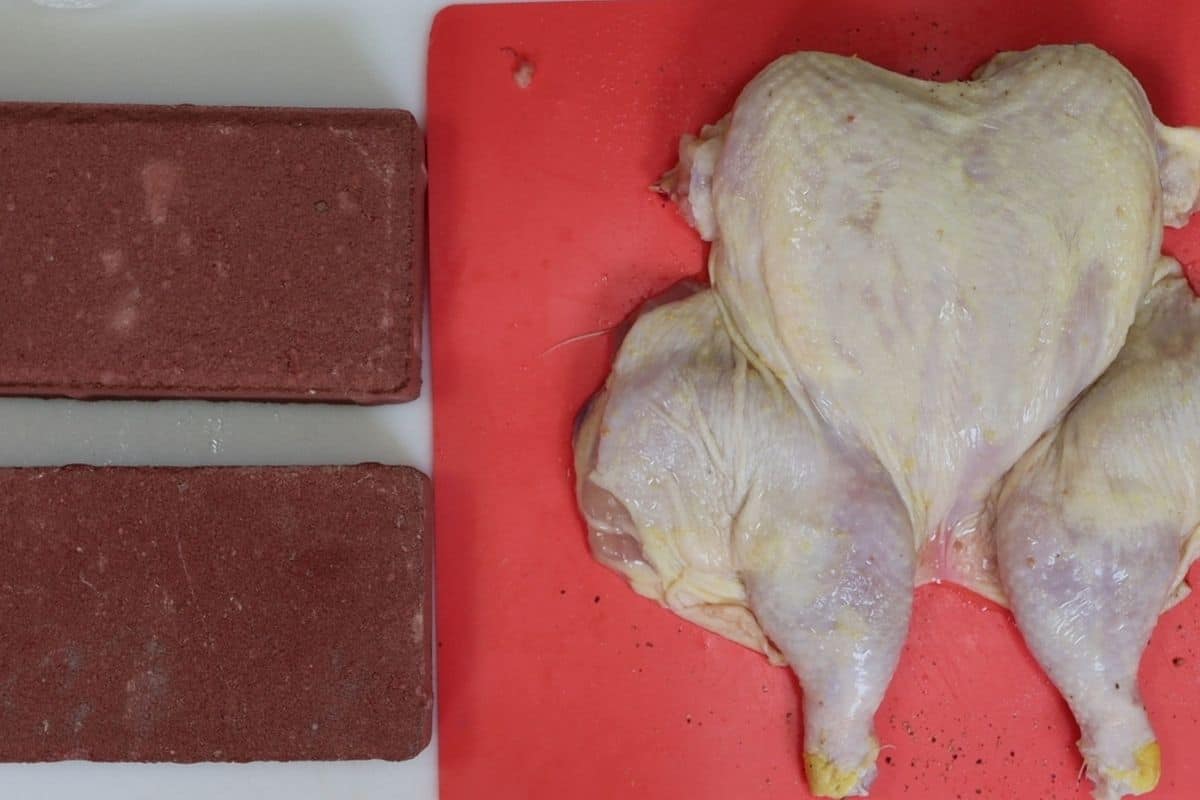
The simple answer is not necessarily. Yes, if you have them you should use them. If you don't have them, you can buy them at Home Depot for about $.67 each. This is what I did. I purchased new bricks which will now be my designated cooking bricks. You only need two bricks for this recipe. You can also use a cast iron skillet in place of bricks. Skillets are heavy and have the same effect as brick. You'll also need an oven safe, heavy bottomed pan for this that can fit a whole chicken.
How to Spatchcock a Chicken for crispy brick chicken
I think the main point of brick chicken is to eat incredibly delicious crispy-skinned chicken. Cooking the chicken under bricks will give you that crisp. The technique for accomplishing this is called spatchcocking.
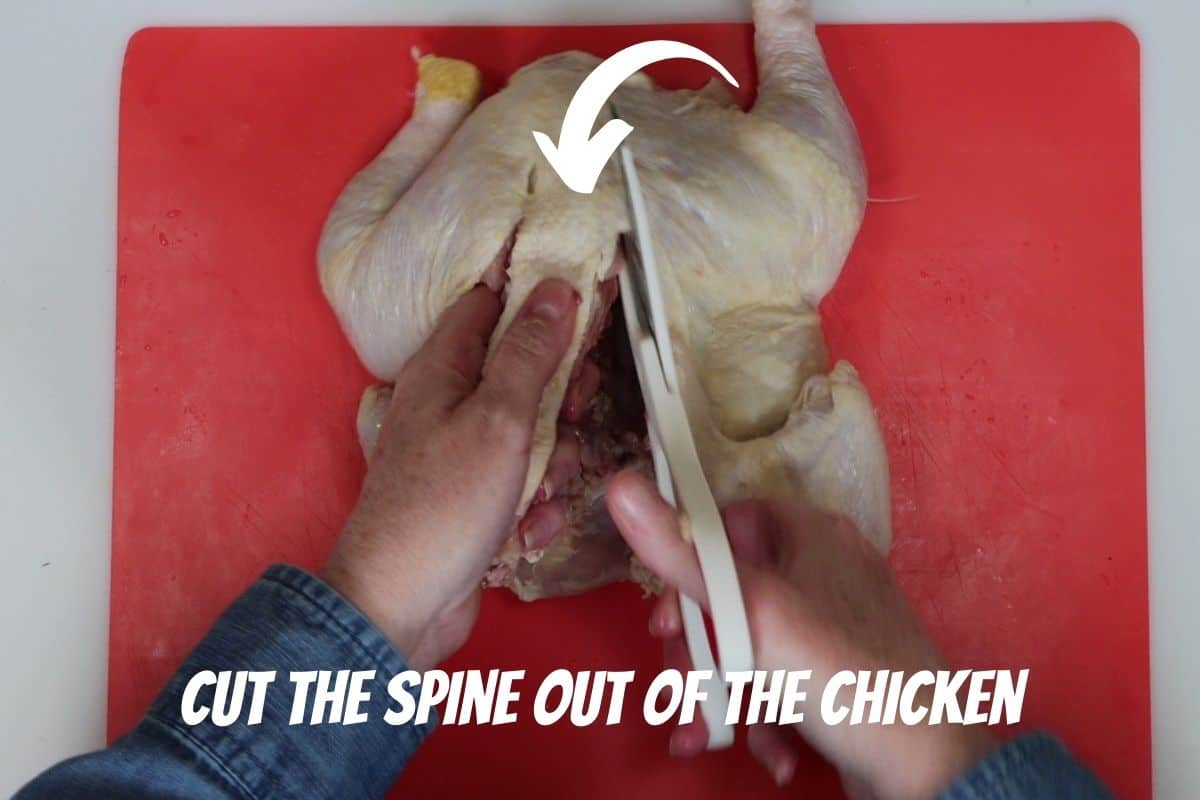
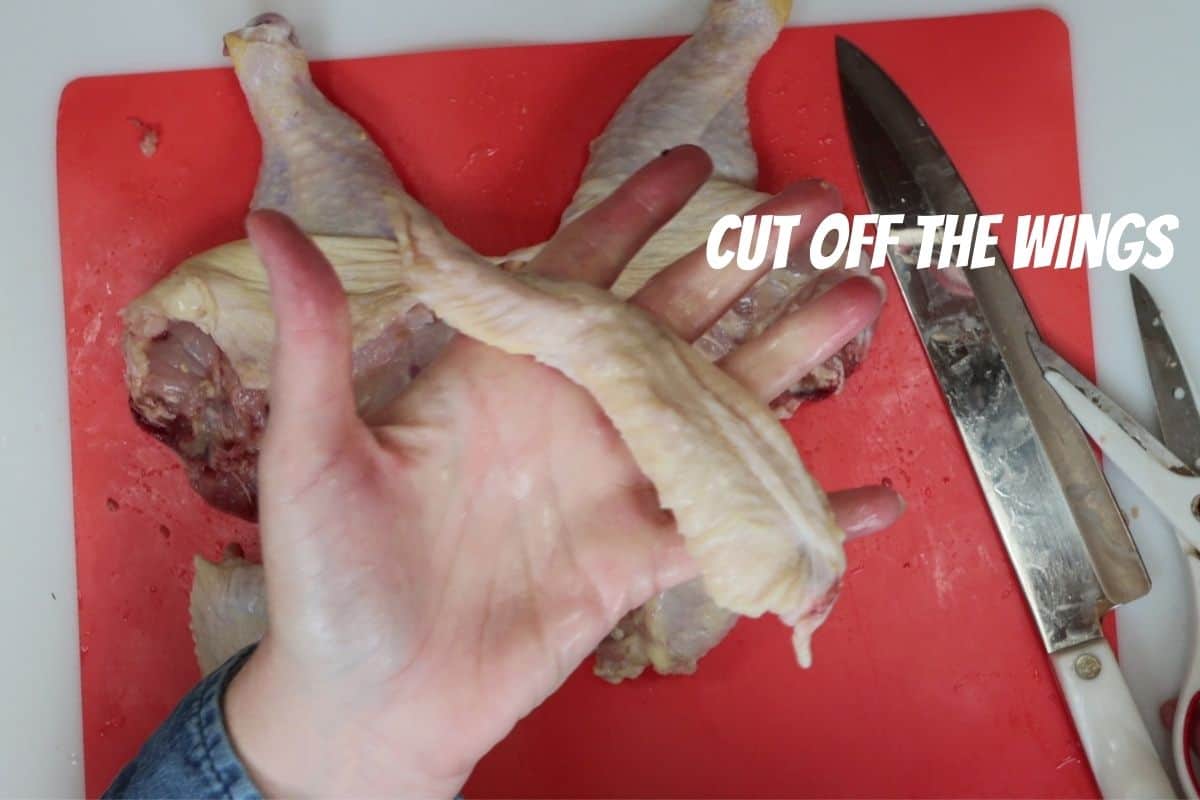
You need sharp kitchen scissors for this. This video is my very first attempt at brick chicken and I couldn't be happier with the result. To make this crispy-skinned treasure, the chicken needs to be laid out flat. Therefore, you need to remove the spine of the chicken. It will be easier to do this is you have great kitchen sheers. I've been needing to replace my sheers for a while so it was a little difficult getting through. But it's fine. You can watch me do it for the first time and struggle. This is what it will look like when you do it for the first time.
Would you like to save this?
You'll also be the first to hear about new recipes in my weekly-ish newsletter! 🙂
Two temperature options for cooking brick chicken
I cooked two chickens to see which temperature would be the best and here's what I can tell you:
- Starting at 500 degrees and reducing the temperature to 450 degrees after 10 minutes worked best and will take 35-40 minutes to cook the chicken.
- Cooking at 500 degrees the whole time works too and will take 30-35 minutes. Not that big of a time difference. However, and this could be my oven and ventilation talking, I found my entire kitchen (and then some) filled with smoke that was awful. If you have great ventilation above your stovetop you probably won't have this issue. For me, the smoke was terrible. Keep this in mind.
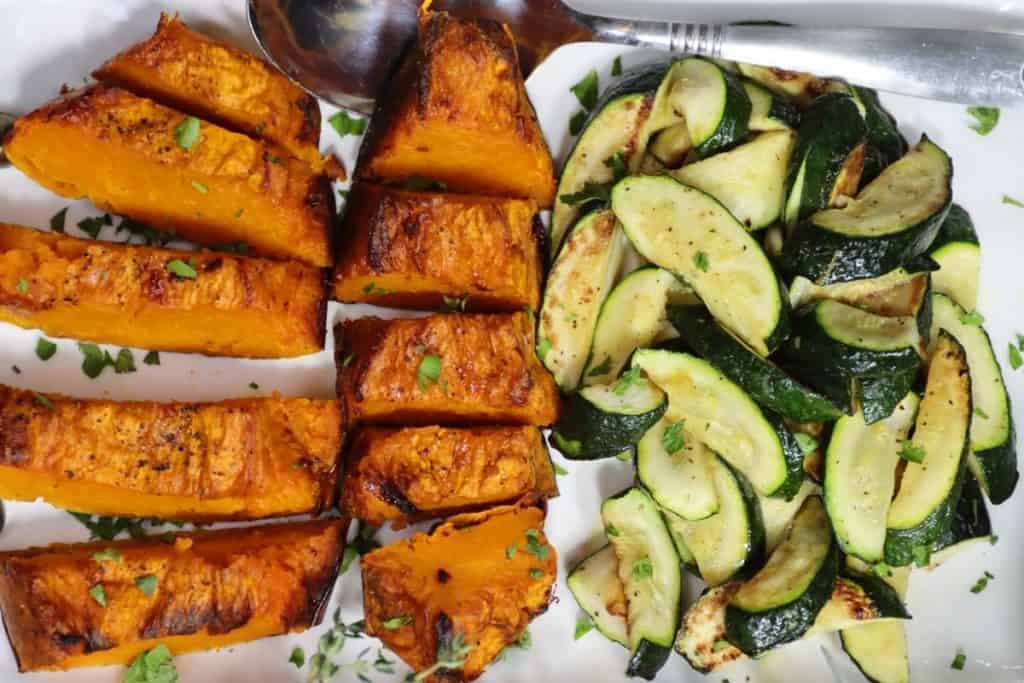
Round out your crispy brick chicken dinner with roasted calabaza squash
I have seen calabaza squash in the produce section but had never tried it before this recipe. The piece I found was a fairly large chunk of squash and it was, somehow, only $1.35. I found this squash very similar to butternut squash - it had a slight sweet and nutty flavor to it. I didn't show it in my video, but I also decided to make a last-minute zucchini side too. For this I used the same technique as my Simple Veggie Medley Sauté so it's a very quick and easy addition to the meal!
If you are looking for more awesome chicken recipes, I've got you covered:
- Sheet Pan Drumsticks w/Roasted Carrots and Cumin Potatoes
- Crispy Chicken Thighs with Honey Garlic Sauce
- Easy Chicken Valdostana
- Three-Cheese Stuffed Chicken w/Sausage & Red Sauce
- Stove Top Stuffing Chicken Rolls
Phew! I feel like I've covered a lot of ground here! But you know me, I can't sign off without talking about how much I love making food for my loved ones. And even if you think you can't cook - you probably can. Cooking and sharing meals with the people in our lives is an important tradition to pass along. It gives us time to appreciate our lives and share our stories. I highly encourage you to take care of yourselves out there in this crazy world. Slow down a little and make delicious food.
Print
Crispy Brick Chicken with Pan Sauce and Veggies
- Prep Time: 50 minutes
- Cook Time: 40 minutes
- Total Time: 1 hour 30 minutes
- Yield: 4 servings 1x
Description
If you want to make a fantastic crispy brick chicken with pan sauce and veggies, I've got a great recipe with easy-to-follow instructions right here.
Ingredients
- 1 3 ½ to 4 pound whole chicken
- ¾ tablespoon salt
- ¼ teaspoon pepper
- 1-2 tablespoons canola oil
- Lemon wedges, optional garnish
- Chopped parsley, optional garnish
The Pan Sauce
- 1 small-to-medium shallot, cut in rings (= approx ½ cup)
- ½ cup of white wine (cheap stuff is fine)
- ¾ cup low or no sodium chicken broth
- 3-4 sprigs fresh thyme
- 2 sage leaves
- 1 tablespoon butter
- ½ cup water (more as needed)
The Calabaza squash
- 1 chunk of Calabaza squash (mine was 1.36 lbs)
- Salt and pepper to taste
- Olive oil as needed
Optional Zucchini Side
Same method as my Simple Veggie Medley
***PREP TIME ABOVE INCLUDES THE 20-30 MINUTES YOU LET THE CHICKEN SIT TO DRAW OUT THE MOISTURE.***
SUPPLIES NEEDED: Aluminum foil, oven-safe pan, bricks (see note #1 if you don’t have bricks)
Would you like to save this?
You'll also be the first to hear about new recipes in my weekly-ish newsletter! 🙂
Instructions
STEPS TO SPATCHCOCK THE CHICKEN:
- Using sharp kitchen shears, you’ll need to spatchcock the chicken. This means you will need to cut the spine out of the chicken. This recipe was the first time I did this and it wasn’t as hard as I thought it would be.
- Run your scissors down each side of the spine and cut it out. You may have to wrestle with it (like I did) but it can be done! Watch my video and you can see the steps.
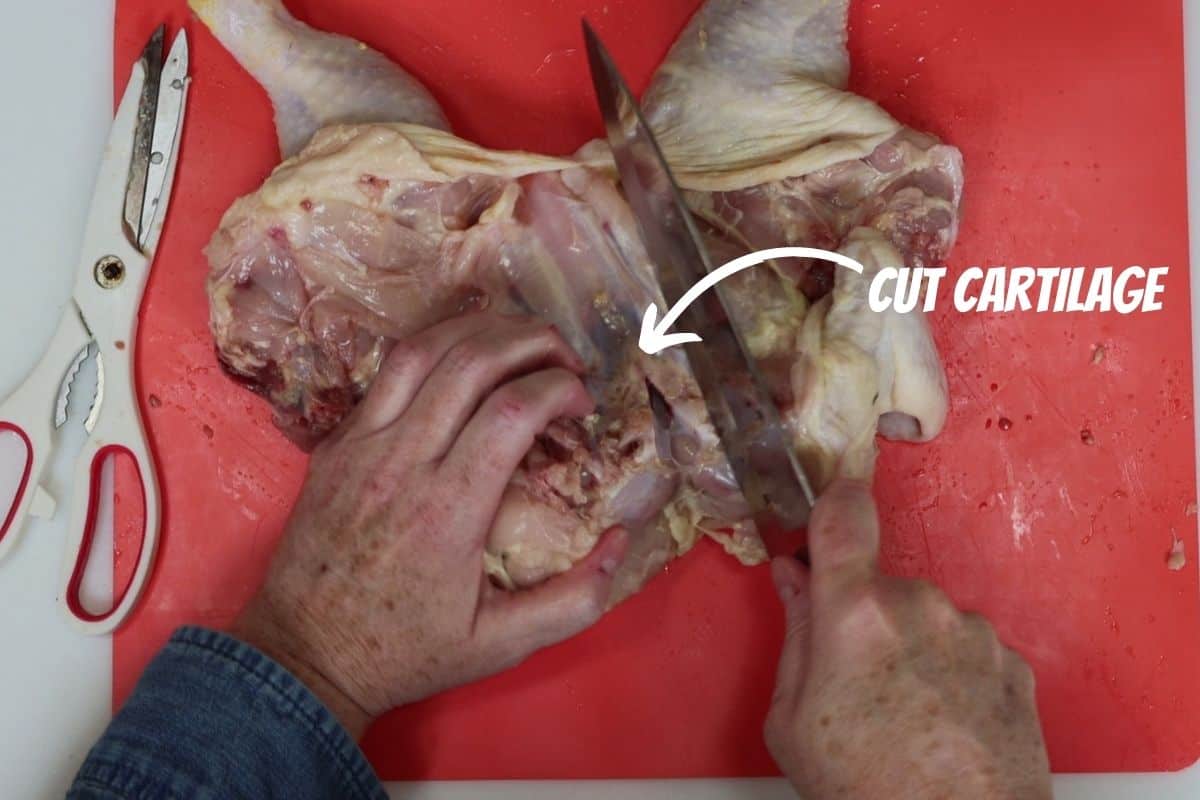
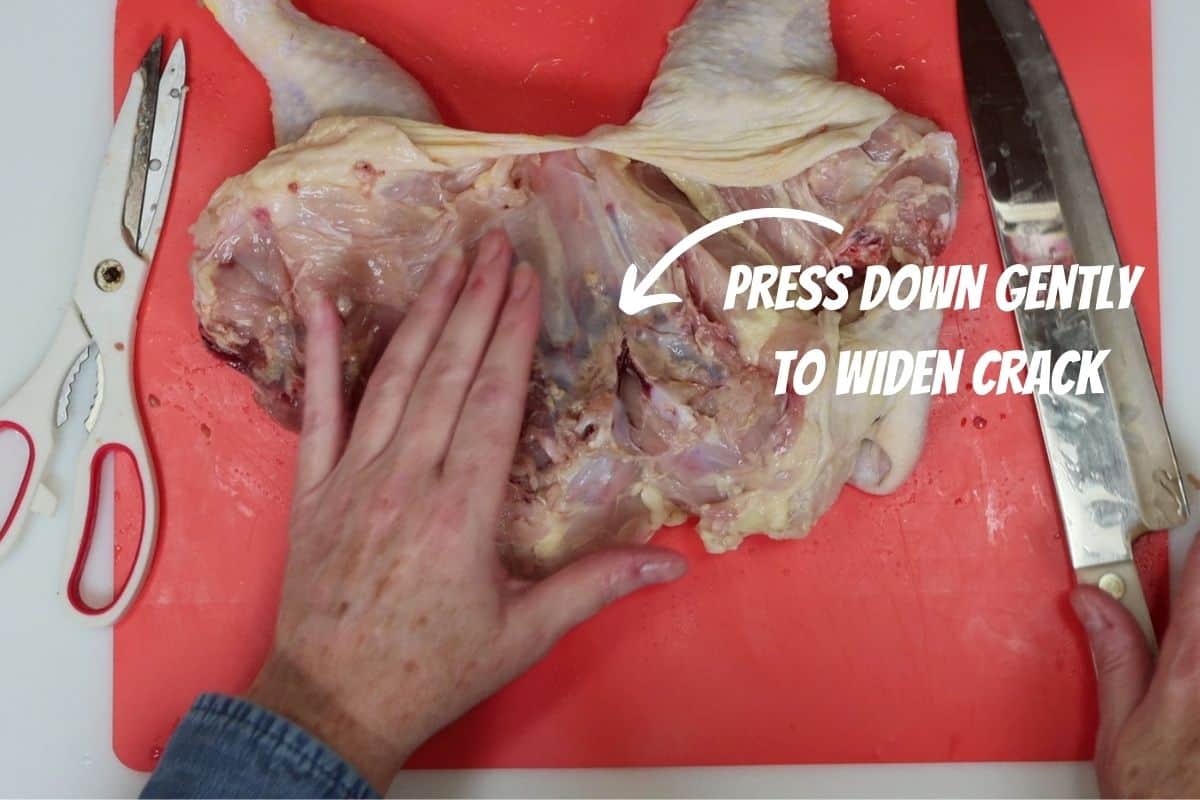
- In order for the chicken to lay flat, you also need to cut the cartilage at the base of the breast bone. Once you make a small cut there, press gently down with your hands to widen the crack – you’ll likely hear an actual “crack” sound.
- The chicken will now lay flat. Again, watch my video and you can following along while you do it yourself.
REMAINING INSTRUCTIONS:
- Salt and pepper the underside of the chicken. Turn chicken over and salt the top (skin side) of the chicken too. Let the chicken sit for 20-30 minutes to draw out the moisture of the chicken.
- While the chicken sits, preheat your oven to 500 degrees.
- It’s also time to cover your bricks with foil. (See note #1 below if you don’t have bricks) Heavy duty aluminum works best, but if you don’t have that just do 2 layers of regular foil.
- After 20 minutes, a lot of water came out of my chicken and I had to hold it over the sink and let it drain out there. After that, blot the chicken with paper towel to get the rest of the moisture. This may remove some of the salt on the skin side which is fine.
- About five minutes before you are ready to put the chicken in the oven, place your pan in the oven to heat it up a little. Be very careful when you remove the hot pan. You can put it on your stovetop or on a hot plate on the counter.
- Drizzle canola oil on top of the chicken and some in the pan too. The oil will sizzle a little. Place the whole chicken in the pan SKIN SIDE DOWN. Place one foil-wrapped brick on one side of the chicken and one on the other. Cook in oven for 35-40 minutes until internal temperature is 165 degrees. After 10 minutes at 500 degrees, reduce the temperature to 450. (See note #2 below)
- While the chicken is cooking prep the squash. Spoon the seeds out of it. Cut in half and lightly coat with olive oil, salt and pepper. Place in a small baking dish and put it in the oven with the chicken. Cook until tender.
- Prep for the pan sauce. Sage and thyme are included in the “poultry” seasoning package of fresh herbs so I used that. Remove the leaves from a few sprigs of thyme by holding the stem and gently running your fingers down the stem. The leaves should remove easily. Next, stack and roll the two sage leaves, slice then dice into smaller bits from there.
- Combine the sage and thyme and give a rough chop if needed. If you are garnishing with the optional parsley you should chop that now too.
- Cut one small-to-medium shallot into rings.
- Once the chicken is done, transfer the chicken to a small sheet pan. Put your oven broiler on high and place the sheet pan on a middle rack. We want to give the chicken an extra crisp here. This should only take a few minutes. KEEP YOUR EYE ON IT. It can burn very quickly if you walk away from it. Once it’s crisped remove from oven to rest.
- When you remove the chicken, the squash should also be done just poke it with a fork to make sure it’s tender all the way through. If it needs another few minutes, let that finish and then switch over to broil the chicken skin.
- While the chicken is resting, make the pan sauce. The whole sauce should only take about 8 minutes to make. Start by removing most of the fat from the pan the chicken cooked in.
- Leave about a tablespoon or so of fat in the pan and discard the rest. Also, leave all the brown crusty bits in the bottom of the pan. This adds major flavor to the sauce we’re making.
- Put the pan over medium heat and add the shallots to the fat. Stir for 2-3 minutes until they start softening.
- Add the white wine and stir another couple of minutes until most of the wine cooks off, the shallot rings have separated and the brown crusty bits in the pan start dissolving.
- Add the sage and thyme into the pan and stir for a minute or two until fragrant.
- Add the chicken broth to the pan and stir for a couple of minutes. The brown bits should be dissolved by now.
- Add the butter and stir until melted. Then taste the sauce. It might be a bit too salty (from the brown bits) so you need to add a little water and mellow it out. Start with ½ cup and taste again. This was the perfect amount for me, but if you need to add a splash more water go ahead.
- If juices have accumulated in the sheet pan you broiled the chicken with, add those juices to the pan sauce.
- Slice the squash any way you like and put the pan sauce in a bowl for serving.
Notes
- If you don’t have bricks you could put the chicken in a large oven-safe pan and rest another heavy-bottomed pan (like a cast iron skillet) on top of it.
- Cooking temperature. As discussed in the blog post: starting at 500 then reducing to 450 degrees worked best. I cooked another chicken at 500 degrees the whole time and my kitchen (and entire downstairs filled with smoke). I only have the crappy above-the-stove-top microwave “vent” which is horrible – you too?? Then start at 500 and reduce to 450 degrees. Ovens are different, vents are different – it’s your call.
- Adding water to the pan sauce. This is discretionary, but I used about ½ cup. You do not need to add salt to the pan sauce because the brown bits are salty enough. In fact, the reason for adding the water is to mellow out the salt from the brown bits. So add water at your discretion until the flavor is right for you.


Leave a Comment