

Turkey and gravy. This is what it all comes down to. Fresh, juicy turkey and a top-notch homemade gravy from the drippings. This is a very simple turkey for beginners. The turkey will shine by doing very little to it. Before you start scrambling all over the internet looking for all the best turkey tips, here are a few easy ones to remember.
Turkey for Beginners:Turkey Tips That Make a Difference:
- Read the instructions on the turkey wrapper. It will usually provide you with a table of information based on what size turkey you purchased and what temperature you should cook it. For example, it will tell you how long to cook a 19 pound turkey at 325 degrees or at 350 degrees depending on your temperature preference.
- Keep watch on the red popper thermometer that is already inserted into the turkey when you purchase it (in most cases). When it pops up your turkey is DONE. Don't second guess - it popped for a reason.
- Have your kitchen thermometer ready to check the thickest part of the bird. Just like chicken, you want the internal temp to be 165 degrees before consuming. If the red popper thermometer popped it's done, but I always check the internal temp anyway just to be safe!
- Keep your turkey covered in foil until the last hour of cooking. If you cook it uncovered the whole time, the skin will dry out and probably burn.
- Basting the turkey in it's own juices will not make the skin soggy. In my experience, as long as you baste after the foil has been removed the skin will be crispy.
- Plan that some things will go wrong and don't panic. For example, when I filmed cooking this turkey the foil fell off the back and I didn't know it. So part of the turkey was fully browned when I checked it an hour before it was done. Oops! Guess what? I simply covered the already-browned part in the foil while the rest remained uncovered for the last hour of cooking. Made no difference. Turkey was still outstanding!
- Remove juices from the pan. You will use this juice and fat as the base for the homemade gravy.
Thanksgiving: The One Time a Year You Cook a Turkey!
Welcome to my Thanksgiving Series! This is a feast I made for about $95 and it serves 8-10 people. You’ll probably still have some leftovers too! I bought a whopping 19½ pound turkey and economized as much as I could to keep this under $100. I know staying on a budget is important. This is my first Thanksgiving as a food blogger and I hope to add new Turkey Day recipes each year. The dinner here is a budget-friendly, beginner-friendly option.

All the Thanksgiving Series Essentials:
- Fantastic No-Frills Mashed Potatoes
- Easy Pepperidge Farm Stuffing with Apples & Celery
- Steamed Brussel Sprouts w/Toasted Pine Nuts & Bacon Bits
- Sautéed Butternut Squash with Caramelized Leeks & Thyme
- Killer Apple Pie with Butter Crust
Would you like to save this?
You'll also be the first to hear about new recipes in my weekly-ish newsletter! 🙂
Need some appetizer ideas? No problem!
- Holiday Appetizers: Phyllo Cups FIVE WAYS!
- Stuffed Mushrooms w/Sausage, Cheddar & Panko
- Nana's Weird Hot Dog Appetizer (the kids will love this!)
- Honey Butter Bourbon Shrimp
- Brown Sugar Bacon Sticks Brushed w/Maple Syrup
- Apple Brie Crostini w/Pecans & Honey
- Warm Shrimp & Gorgonzola Dip w/Pancetta Bacon (make-ahead friendly)
- Crispy Thai Pork Toast (make-ahead friendly)
- Crunchy Baked Kale Chips (great for vegetarians)
Turkey for Beginners: What Would it Be Without a Fantastic Gravy?
When it comes to the gravy there are many ways you can do this. I kept this recipe really simple. Remove the turkey juices/fat from the baking pan. I also used chicken broth because I didn't want to use too much fat from the turkey. I know some of it is juice, but I honestly don't know the ratio of juices to just plain fat... so chicken broth is a must here.
Use the fresh thyme on hand from the butternut squash recipe to season the gravy along with salt and pepper. You can thicken the gravy by making a slurry. This is equal parts flour and water whisked together. If you want the gravy a bit thicker you can make additional slurry if needed. It's very easy to make and only take a minute.
So there you have it! Thanksgiving turkey for beginners and homemade gravy. I hope you enjoy this recipe. If you have some non-turkey lovers attending your feast you can always make my Stove Top Stuffing Chicken Rolls. And for the vegetarians, I have a fantastic Butternut Squash Risotto your guests will love. In the pictures, I served it with sausage, but the recipe for the risotto is vegetarian.
I hope you can it make it to your kitchens during the holidays and serve homemade food to your loved ones. It's a special time of year to reconnect with friends and family, sit around a table and share our lives. It's never been more important to put down our devices and simply exist. Tell your stories and listen to others. Enjoy the simple pleasures. It will do wonders for your peace of mind.
Print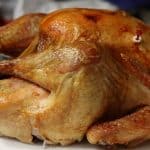
Thanksgiving Turkey and Gravy
- Prep Time: 10 minutes
- Cook Time: 4 hours, 30 minutes
- Total Time: 4 hours, 40 minutes
- Yield: 8-10 servings 1x
Description
This is a simple, beginner-level recipe for cooking a whole turkey. Don’t overthink it. The turkey will shine by doing very little to it.
Ingredients
For the turkey:
- 1 19 ½ pound turkey (18-20 pound range is fine)
- 2 tablespoons butter, melted
- 1 tablespoon salt
- 1 can of cranberry sauce (any size you want)
For the gravy (makes 4 cups – double the recipe if you need more)
- 2 cups of turkey juices/fat from the baking pan
- 2 cups chicken broth
- ¼ teaspoon salt (more if you like)
- ¼ teaspoon pepper
- ½ teaspoon fresh thyme
- ¼ cup AP flour (for slurry)
- ¼ cup water (for slurry)
- 1-2 tablespoons of stuffing
NOTE: It will be helpful to have kitchen twine (string) to tie the turkey legs together.
Would you like to save this?
You'll also be the first to hear about new recipes in my weekly-ish newsletter! 🙂
Instructions
For the turkey:
- Don’t forget to watch the video with step-by-step instructions.
- Melt butter in a small bowl or ramekin.
- Foil a large baking dish to put the turkey in. Mine was 18”x15” and held a 19 ½ pound turkey very well.
- Remove gizzards from inside turkey and discard. That is, unless you do something with them. I don’t so I discard them.
- Place the turkey in the foiled pan. Using a pastry brush, spread the melted butter all over the turkey.
- Sprinkle the salt on the turkey covering all areas. I didn’t lift it up to salt the bottom.
- Tie the legs together with kitchen twine. Wrap the string around the legs and tie it in a knot. My video shows this well.
- Cover the turkey in foil and cook in a preheated oven at 325 degrees. COOKING TIME WILL VARY: The size turkey you have will determine how long you should cook it. Read the instructions on the turkey wrapper. There are different cook times for different turkey sizes and temperature. My turkey cooked in about 4 ½ hours at 325 degrees. You should remove the foil from the turkey for that last hour of cooking it so the skin will brown.
- While the turkey is cooking you should chop the fresh thyme that will be needed to make the gravy.
- When there is one hour left of cooking, remove the foil from the turkey. At this time, I did wrap only the wings in foil because they tend to brown easily and I didn’t want them to get any more cooked. I removed some of the juices for the gravy. You can remove more after the turkey cooks the final hour. You can also baste the turkey with the turkey juice if you’d like. If you don’t have a baster just use a large spoon.
- Keep watch on the red popper thermometer in the last hour of cooking. When it pops out the turkey is done. I usually check the internal temperature anyway just to be safe. Internal temp should be 165 degrees before consuming.
- Let the turkey rest – UNCOVERED – for 30-45 minutes. Chef tip: this is the best time to stick your stuffing in the oven and get ready to prepare the mashed potatoes. Mashed potatoes are the very last thing I make right before everything goes on the table Thanksgiving Day.
- Slice your turkey with a sharp knife or electric knife and arrange on a platter. Enjoy!
- Oh, and don't forget to put out your cranberry sauce! YUM!
For the gravy: (see extra notes below)
- Remove turkey juices from the baking pan and put them in a pot on low-to-medium heat.
- Add the chicken broth to the pot as well.
- Add the salt, pepper and fresh thyme and stir well. Heat until it’s almost at a boil.
- In a small bowl, mix the flour and water together to make a slurry. This is a thickening agent for the gravy. Add this to the gravy and stir well. Turn heat down and let gravy thicken. If you want your gravy a little thicker, make a little more slurry and add it in. It’s equal parts flour to water.
- Add a couple tablespoons of stuffing to the gravy and mix well.
- Taste the gravy and if you think it needs more salt or pepper you can add it here.
Notes
- Always keep a couple of instant gravy packets as a back-up or to enhance the flavor of the gravy. My mom will sometimes add a gravy packet to the gravy as well. I didn’t do that, but you can if you like.
- Your turkey may come with a packet of already-made gravy inside the turkey. Go ahead and use that too!
- My gravy recipe made 4 cups of gravy, but if you think you need more just double the recipe. It did feel like I needed just a little more gravy and it’s always better to have too much gravy than not enough.


Leave a Comment